Showing posts with label Midi. Show all posts

Monday, April 2, 2007

TIPS: Freeze VSTi plugin and decrease CPU usage to add more tracks in Nuendo 3

How to Freeze VSTi Plugin:
We all face problems when we use a number of midi tracks playing lot of different VSTi's. Some VSTi's almost bring your CPU load to shoot 100% usage and halt. "Freeze" feature is the best solution in such condition. Since all virtual instruments use CPU processing for real time sound generation, we can disable them to save CPU usage. Freeze is a feature which allows you to remove the VSTi while you can still hear the sound. You start sequencing as usual using VSTi and midi track as shown below.

Nuendo 3

After you are done with the track open VST instrument panel and click the Freeze switch on the left as shown below:

Nuendo 3

A dialog will open as shown below.

Nuendo 3

You need to select "Freeze instrument only" and check the box "Unload instrument when frozen". If your sound has long sustain tail then you need to adjust your tail size depending on the length of tail otherwise 10s is enough.

Nuendo 3

In case you are using a multi channel VSTi, you can freeze instrument along with all the channels as shown below only if you are done with all the channels.
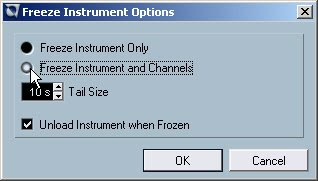
Nuendo 3

When you press OK button the midi tracks are rendered as wave file and played through the same VSTi audio channel. The midi track gets faded showing that the track is freeze and cannot be played in real time now as shown below.
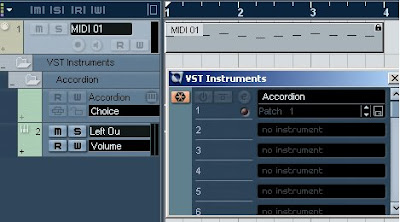
Nuendo 3

How to unfreeze or enable VSTi Plugin:
If you want to modify or make changes to the tracks you have freeze, you need to unfreeze them in order to enable the real time playback of VSTi through midi track. The track is disabled or faded when it is freeze as shown below and cannot be recorded or played back in real time.

Nuendo 3

First of all open the VST instrument panel and press the Freeze button as shown below to unfreeze the instrument and enable the midi track.

Nuendo 3

A dialog will open, press unfreeze as shown below. This will load the VSTi again and enable the midi track again.

Nuendo 3

After unfreezing you can again start working on the same track for editing or further addition without any problem. It will appear normal as shown below and can be re modified any number of time.

Nuendo 3

Hope now you have become familiar with the freeze function in Nuendo 3 and can use it without any problem.

Saturday, March 17, 2007

TIPS: Midi recording problem in Nuendo 3.2 with Edirol FA-66 FireWire audio interface

Problem: Last week one of my client faced a peculiar problem in Nuendo 3.2 while sequencing ( recording midi tracks ). The midi notes would not get recorded despite being played and heard while recording.
The nature of symptoms for such problem are :
  1. Persistent timing problems (shifted notes etc.) while using native or emulated Direct Music midi ports.
  2. Using emulated Direct Music midi ports often results in shifted MIDI events while recording (events are recorded too late or too early).
  3. After recording for a while the MIDI events are not recorded at all despite of being played and heard while recording.
  4. Sometime after recording you find that all the notes have been shifted to the beginning of the sequenced event.
The system was based on Intel D945GNT motherboard with 3.4Mhz dual core processor having 1Gb DDR2 533Mhz RAM and 2 x 250GB SATA Seagate Hard disk. The sound card he was using was Edirol FA-66 FireWire audio interface connected through Iogear "Texas Instrument" based PCI FireWire card. It seems D945GNT is not suitable for FireWire audio interfaces as I have faced audio problems using Tascam audio hardware also on the similar type of setup.
I connected FA-66 to other system and found working properly without any midi loss at all. I even tried VIA based FireWire card in the same system with no success. The problem is that Nuendo 3 midi port handling is not compatible with D945GNT motherboard as you encounter the problem while using this motherboard only. 

Solution:See that you should have DirectX 9.0c installed properly if you are using emulated Direct Music Midi ports.
  • If you are using Direct Music midi Ports then you should enable (check) the option “Use System Timestamp” provided in the Direct Music midi section of the Device Setup dialogue. This option uses another timing reference in your system when enabled.
  • If you are using Windows midi port then you should enable (check) the option “Use System Timestamp” provided in the Windows Midi section of the Device Setup dialogue. This option uses another timing reference in your system when enabled.
Just check the box as shown above in the figure and it should solve all your midi timing and recording problems.

Sunday, January 7, 2007

TIPS: Calculate Delay time to synchronize with Beat

I know that most of the musicians and recordists are always confused about how to set delay time in Delay effects. It is very simple, but only if you remember the equation.

  • Delay time in ms (Milli-seconds) = 60000/BPM (Beat Per Minute)


The above equation gives you the timing for every beat (i.e. the delay repeats will be synchronized with your beats).


The same thing in a musicians term will be as under :


  • Delay time for crotchet in ms = 60000/BPM (Beat Per Minute)
  • Delay time for Quaver in ms = 60000/BPM/2 (Beat Per Minute)
  • Delay time for Semi-Quaver in ms = 60000/BPM/4 (Beat Per Minute)

Example :

Suppose your song tempo is 120 BPM, then the delay calculation is as follows:


  • Crotchet timing in ms (Milli-seconds) = 60000/120 (BPM) = 500 ms
  • Value for Quaver is = 500 ms / 2 = 250 ms
  • Value for Semi-Quaver is = 500 ms / 4 = 125 ms

For recordists who are not familiar with the musical terms:


  • Value of Crotchet is for synchronizing with 1 beat.
  • Value of Quaver is for synchronizing with 1/2 beat.
  • Value of Semi-Quaver is for synchronizing with 1/4rth beat.

Explanation :

BPM means beats per minute. So a tempo of 120 BPM means that the song is playing 120 beats per minute. Therefore 120 beats / 60 seconds = 2 beats per second. Since 1 second = 1000 Milli-seconds, hence if we divide 1 second (1000 Milli-seconds) by 2 Beats, we get 1/2 seconds ( 500 Milli-seconds) for every beat.

So, now no one should get confused while deciding the delay time in a delay plugin.

Thursday, December 28, 2006

Difference between Midi and Sound stored in a Musical Instrument

Most people are confused about MIDI and keep asking me that how can the sound of one music synthesizer/Keyboard be loaded into another synthesizer/keyboard.

First of all let me explain that MIDI means Musical Instruments Digital Interface. It is a digital code or language for storing musical information in digital format (Music Data) or communicating between two or more digital music workstation/instrument (i.e. sending or receiving musical data from one digital musical instrument/computer to any other digital musical instrument/computer).

It was initially designed to carry or store only the basic Musical Note information with controller messages such as velocity, after touch, pitch bender etc. along with tempo and channel information.

But later it was enhanced with other messages such as system exclusive and Midi time code (MTC) etc.

But it does not contain any audio data.

In a keyboard there are two sections viz:

1. Midi section
2. Sound generator section.

1. When you play a keyboard and press a key/Note, the Midi section generates and sends a digitally encoded musical information (called MIDI DATA) containing the note information and other parameters (such as velocity, expression etc.) to the sound generator section, which decodes the information and generates the sound as per the instructions in MIDI DATA.

2. The sound generator section is the sound module which can either synthesize or trigger a wave sample (pre-stored sound in ROM chip in wave format) to generate a sound upon receiving instruction in digital format (MIDI DATA) from midi section.

Now it is clear that if you have a midi port on you instrument, it can only send or receive midi data and not the audio/sound as it is not present in the midi data.

Hence you can transfer midi information between instruments to play a sound from another instrument or so, but you cannot transmit or load the sound through midi port to other instrument.

Please note that this article is not a complete description of midi - it is just to clarify that sounds of one keyboard cannot be loaded into another keyboard using MIDI.

Note: Patch parameters are MIDI information regarding how the sound will be played (attack, decay, sustain, filter etc.). Hence you can transfer or exchange patches using Midi from one instrument to another of same genre (i.e. different models having same sound generator module inside them although having different features, such as Roland JV880, JV80, JV90; XP60, XP80; etc.).

So don't think that you are copying sound from one instrument to another when you copy a patch as it is only the Midi information and can only be used with the identical sound generator section of different models of same genre.

Hope this article will be able to reflect some light on differentiation between midi and sound stored in a keyboard or musical instrument.

I am quite busy these days so keep patient as I will keep posting accordingly.

Popular Posts