Tuesday, December 25, 2007

Merry Christmas 2007

WISH YOU ALL MERRY CHRISTMAS 2007

May Christmas bring you joy and happiness this year.

WITH LOT OF LOVE

From

"me"

Monday, November 19, 2007

TIPS: Configure your Firewire Port (IEEE 1394) for proper operation of Sound Card in WinXP SP2

These days almost all the proffessional sound card interfaces are designed for firewire (IEEE 1394) port. Firewire port is considered to be more stable than USB 2.0 port (this is my opinion - others may differ). But people face problems also with firewire port if they have Windows Xp with SP2 installed.
There is an article "Performance of 1394 devices may decrease after you install Windows XP Service Pack 2" if you want to check on microsoft's site.  The performance drops because Windows XP SP2 changes 1394b ports to S100 speed. So if you connect a sound card which is designed to run at S400 speed will not function properly since the data transfer rate has dropped considerably.
To solve this problem you need to edit/modify your registry entry as mentioned below:
WARNING!! - Only make changes if you know about registry. Backup your registry before attempting any change since it could leave your system unbootable if any mistake is done.
1. Click Start, click Run, type regedit, and then click OK.
2. Locate and then click the following registry subkey:
HKEY_LOCAL_MACHINE\SYSTEM\CurrentControlSet\Enum\ PCI\1394_hc_hw_id\1394_instance_id\Device Parameters
3. If the SidSpeed value does not exist in the right pane after you click the Device Parameters subkey in step 2, create it. To do this, point to New on the Edit menu, click DWORD Value, type SidSpeed, and then press ENTER.
4. Right-click SidSpeed, and then click Modify.
5. In the Value data box, type one of the values that are shown in the following table, and then click OK.
Value Speed
0 ------ S100 speed
1 ------ S200 speed
2 ------ S400 speed (default value)
3 ------ S400/S800 speed (Windows XP Service Pack 1 [SP1] value)
Note If you try to use a value that is larger than 3, SidSpeed will use a value of 0 (S100 speed).
6. Quit Registry Editor.
To locate the FireWire controller information, follow these steps:
1. Open Device Manager. To do this, right-click My Computer on the Start menu, click Manage, and then click Device Manager under System Tools. You can also click Properties under My Computer, and then click Device Manager on the Hardware tab.
2. Locate your FireWire controller in the IEEE 1934 Bus host controllers section.
3. Right-click the FireWire controller entry, click Properties, and then click the Details tab.
4. Click Device Instance Id. You see a string of letters and numbers that is similar to the following:
PCI\VEN_104C&DEV_8020&SUBSYS_00D81028&REV_00\4&19FD8D60&0&60F0
The information between the two slash marks (\) is the “1394_hc_hw_id".
“VEN_104C&DEV_8020&SUBSYS_00D81028&REV_00” is the hardware ID in this example. The information that follows the second slash mark (\) is the “1394_instance_id”. “4&19FD8D60&0&60F0” is the instance ID in this example.
If you are confused do not attempt yourself - instead consult some computer technician.

Saturday, September 15, 2007

TIPS: Creating new project in SONAR LE

Sonar LE is a nice DAW for music creation. I will explain what all things you should observe while creating a new project in Sonar LE.

Go to options > Global > select Audio Data TAB as shown below.

Enable the "Use Per-Project Audio Folders" option by checking the box. This will help you to keep all the audio data related to particular project in their respective project folders. So you will not mess up all your audio files related to different projects into one single Global Audio Folder since this will make individual audio sub-folder for each project inside the project folder.

After opening Sonar and enabling the Use Per-Project Audio Folders - close the default song.

Select New from File menu ( File > New... ) it will open a dialog as shown below.

Give a Name to your project as shown below. You will notice that when you enter the project name the Path mentioned below gets modified by itself and creates a Folder with the Project Name and a sub Folder named Audio.

You can select whether you want to use any pre-designed template from the list or a normal blank project document.

Now select save as and save the project in Normal mode.

Before setting the Tempo of the project you should set Meter / Key Signature. By default, a new SONAR LE project is in 4/4 time and the key of C major.

To edit open the "Meter/Key View" as shown below.

Click on "insert Meter/Key" as shown below.

A new window will open - you can enter the values of your choice. Meter/Key Signature changes applies to all the tracks and can be changed at different measures.

Now you can set the tempo of your project. After each change you should save the project. You can further set the Audio bit depth and sampling frequency for the wave files. Open "Option > Audio...." you can enter the value for Sampling rate and File bit depth.

Friday, August 3, 2007

Planning to post soon

I am extremely sorry to say that I was not getting enough time for my Blog. But Don't worry I will be posting new tips and tricks soon. Some reviews of new product will also come. Hope you understand my situation and will keep Patience.

Sunday, June 3, 2007

Listed in dmoz open directory project

"Good News" - I was really surprised and pleased to see that my site is now listed in "dmoz open directory project" under the "Home Recording" section. Please note that it is listed under Top: Recreation: Audio: Home Recording.

The link given below will take you to the listing page where it is listed.
http://dmoz.org/Recreation/Audio/Home_Recording/

Saturday, May 12, 2007

TIPS: Audio drop outs due to Hard Disk

Do you know that the cause of the drop out can be your Hard disk ? Yes I came across two such cases last week where the cause of drop out was Hard disk. The first and foremost thing anyone can suspect is the buffer setting when someone faces drop outs - But the case here was totally different. One of my friend was using Motu 2408 MK3 whereas the other was using M-Audio Audiophile 192. The problem was that they were able to play wave, mp3 or other media files normally using media player without any drop outs. But the problem use to reflect when they were using some audio Daw or sequencer with audio on multi tracks.
Due to some hard disk error the UDMA mode of hard disk got changed to either PIO or UDMA-0 mode causing this problem. Since all the Hard disk are set to UDMA-5 (UDMA100), the data transfer rate is 100MB/sec. Hence the problem showed up only when multi track were played since more audio files are read simultaneously from the Hard disk and since the data transfer mode was set to lower rate - all the data was not being read in time causing drop outs.
So next time you face drop outs in your multi track program check if your data transfer mode is changed or not. Open system in control panel - go to hardware device manager - Check in primary and secondary IDE channel under IDE ATA/ATAPI Controller. Under advance tab of primary and secondary IDE channel see if the transfer mode is set to UDMA Mode 5 or higher.
Hope this will help those who are facing drop outs despite of correct buffer settings.

Thursday, April 12, 2007

SONAR LE - the most complete OEM production software

SONAR LESONAR LE

Cakewalk's Sonar LE is a OEM music production software bundled with the following Brand products :

Roland, Edirol, EMU products, Open Labs, Rain Recording, Samson.

Unlike other OEM bundled applications SONAR LE is designed simple yet it provides complete solution for creating music. The best part is that you can record 64 Audio tracks - which is enough for professional work and you will not think for upgrading immediately. Further it supports 256 midi tracks - which again is quite some for programming midi.

In other words although the name is SONAR LE but the features are more like pro versions. You can have 24 track effects enabled simultaneously. Sonar LE gives you the power to make the best sound quality since it supports 24bit / 192Khz recording.

You can use maximum 8 virtual instruments at a time - No problem as you insert more virtual instruments it effects your system load otherwise. So you can always bounce the virtual instrument to audio track ( since you have bounce the midi tracks for mixing ) in case you need  more instruments to be added.

The final restriction is that you can have only 8 simultaneous inputs and outputs. Hence you can record maximum 8 tracks simultaneously which is sufficient these days and as far as output is concerned - all the mixing is done internally these days. Even if you use a outboard you still have 8 outputs to route.

SONAR LE

SONAR LE

SONAR LE also supports ACID™-format loops and Rewire clients such as Project5, Live, or Reason etc.

The new version of SONAR LE (based on the features of SONAR 6) is supposed to be shipping now as it was scheduled in Feb 2007. The new version has support for Windows Vista (32-bit & 64-bit) —NEW , Windows XP Professional x64 Edition—NEW, and Windows XP operating systems. If you are a registered SONAR LE users then you are eligible to purchase upgrades and other products at special discounts.

What else can you expect from a OEM bundle - it gives you more than some paid Audio suites in the pro audio market. You can compare yourself. For more features which I have not detailed you can go to Cakewalk's site at Cakewalk SONAR LE page

I will give some tips and trick on using SONAR LE in my future posts.

Monday, April 2, 2007

TIPS: Freeze VSTi plugin and decrease CPU usage to add more tracks in Nuendo 3

How to Freeze VSTi Plugin:
We all face problems when we use a number of midi tracks playing lot of different VSTi's. Some VSTi's almost bring your CPU load to shoot 100% usage and halt. "Freeze" feature is the best solution in such condition. Since all virtual instruments use CPU processing for real time sound generation, we can disable them to save CPU usage. Freeze is a feature which allows you to remove the VSTi while you can still hear the sound. You start sequencing as usual using VSTi and midi track as shown below.

Nuendo 3

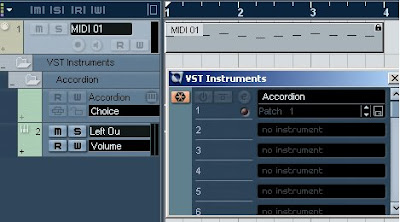
After you are done with the track open VST instrument panel and click the Freeze switch on the left as shown below:

Nuendo 3

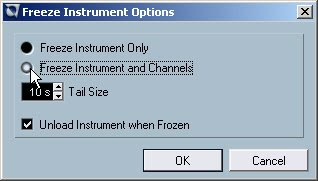
A dialog will open as shown below.

Nuendo 3

You need to select "Freeze instrument only" and check the box "Unload instrument when frozen". If your sound has long sustain tail then you need to adjust your tail size depending on the length of tail otherwise 10s is enough.

Nuendo 3

In case you are using a multi channel VSTi, you can freeze instrument along with all the channels as shown below only if you are done with all the channels.

Nuendo 3

When you press OK button the midi tracks are rendered as wave file and played through the same VSTi audio channel. The midi track gets faded showing that the track is freeze and cannot be played in real time now as shown below.

Nuendo 3

How to unfreeze or enable VSTi Plugin:
If you want to modify or make changes to the tracks you have freeze, you need to unfreeze them in order to enable the real time playback of VSTi through midi track. The track is disabled or faded when it is freeze as shown below and cannot be recorded or played back in real time.

Nuendo 3

First of all open the VST instrument panel and press the Freeze button as shown below to unfreeze the instrument and enable the midi track.

Nuendo 3

A dialog will open, press unfreeze as shown below. This will load the VSTi again and enable the midi track again.

Nuendo 3

After unfreezing you can again start working on the same track for editing or further addition without any problem. It will appear normal as shown below and can be re modified any number of time.

Nuendo 3

Hope now you have become familiar with the freeze function in Nuendo 3 and can use it without any problem.

Friday, March 30, 2007

Latest fast and powerful audio workstation based on Intel Core 2 Duo processor

These days I am busy assembling a new powerful audio workstation for one of my friend. The robust system is consists of the following:
  1. Intel Media Series Desktop Board DG965WH
  2. Intel Core 2 Duo Processor E6600, LGA775 Pkg. 2.40 GHz, 4MB L2-Cache, 1066 MHz FSB
  3. Transcend 4GB DDR2 RAM 800 MHz ( 4 x 1GB DIMM's )
  4. Sony 1.44 inch Floppy Drive
  5. Seagate SATA ST3250824AS 250Gb x 2 ( Total 500GB )
  6. LiteOn 20X DVD/CD Writer and Rewriter
  7. Microsoft Wireless Optical Desktop 700
  8. iBall Cabinet with Extra Chassis Fan Model: - Work Horse (SILVER)
  9. Power Safe 400 Watts SMPS Gold
  10. Samsung Sync Master 940NW 19" wide LCD monitor
  11. Windows XP Professional with SP2

The system mentioned above is really very fast and stable. Since we all know that audio applications require more CPU processing power and RAM to run properly, iBall WorkHorse Cabinetthis system provides ample memory for vsti plugins to load samples and tracks. You should be aware that while using a multi-track recording software the increase in the number of audio tracks increases load on CPU because all the processing takes place in real time ( no pre-rendering). If you are using vst or dx plugins such as delay, reverb, compressor etc as inserts, they further add to processing consumption. Then comes the load of vsti which are very popular these days in making music tracks.
So in order to work smoothly you need a powerful system and the configuration mentioned above will be helpful.

Saturday, March 17, 2007

TIPS: Midi recording problem in Nuendo 3.2 with Edirol FA-66 FireWire audio interface

Problem: Last week one of my client faced a peculiar problem in Nuendo 3.2 while sequencing ( recording midi tracks ). The midi notes would not get recorded despite being played and heard while recording.
The nature of symptoms for such problem are :
  1. Persistent timing problems (shifted notes etc.) while using native or emulated Direct Music midi ports.
  2. Using emulated Direct Music midi ports often results in shifted MIDI events while recording (events are recorded too late or too early).
  3. After recording for a while the MIDI events are not recorded at all despite of being played and heard while recording.
  4. Sometime after recording you find that all the notes have been shifted to the beginning of the sequenced event.
The system was based on Intel D945GNT motherboard with 3.4Mhz dual core processor having 1Gb DDR2 533Mhz RAM and 2 x 250GB SATA Seagate Hard disk. The sound card he was using was Edirol FA-66 FireWire audio interface connected through Iogear "Texas Instrument" based PCI FireWire card. It seems D945GNT is not suitable for FireWire audio interfaces as I have faced audio problems using Tascam audio hardware also on the similar type of setup.
I connected FA-66 to other system and found working properly without any midi loss at all. I even tried VIA based FireWire card in the same system with no success. The problem is that Nuendo 3 midi port handling is not compatible with D945GNT motherboard as you encounter the problem while using this motherboard only. 

Solution:See that you should have DirectX 9.0c installed properly if you are using emulated Direct Music Midi ports.
  • If you are using Direct Music midi Ports then you should enable (check) the option “Use System Timestamp” provided in the Direct Music midi section of the Device Setup dialogue. This option uses another timing reference in your system when enabled.
  • If you are using Windows midi port then you should enable (check) the option “Use System Timestamp” provided in the Windows Midi section of the Device Setup dialogue. This option uses another timing reference in your system when enabled.
Just check the box as shown above in the figure and it should solve all your midi timing and recording problems.

Friday, March 16, 2007

Minima three column blog template

I have been able to edit my Blog template and create a custom basic minima with three columns now as you see.And the borders around are also looking nice. I think I will have to modify some of my previous postings as this new post looks better and organised. The blog template is in xml format and quite easy to modify. If anyone is interested I can post the template for download.

Sunday, February 25, 2007

Some changes in Layout

Today I have just tried to re-arrange columns and colors of my blogs layout and still working on it. It will look more elegant and will be more friendly to surf what you are looking for. This post is to check whether bordered post look nice or not.

Friday, February 16, 2007

TIPS: Audio Drop outs due to low latency

Day before yesterday I was at one of my friends place to solve his problem of drop outs. He was experiencing drop outs with increase in number of Audio tracks. The hardware he was using was TASCAM FW 1804 and the buffer was set to 256 samples for a latency of 9.9 milliseconds approximately. The number of tracks in the particular project he was having problem had went up to 126 Tracks.

We increased the buffer to 1024 samples ( increasing the latency) and the problem was solved. Even if you have audio events only on few tracks - the increase in number of tracks blocks resources for itself when you are using asio drivers. So if you want to work with more audio tracks, you will have to increase latency in order to avoid drop outs. Otherwise try to keep the number of tracks somewhere between 30 to 40 for smooth operation, if you are using vst instrument and looking for lower latency to program midi. Nowadays almost all software's come with a " FREEZE " feature which allows you to freeze you midi track and unload your vst instrument freeing extra resources. When you freeze a vst instrument - the midi track gets converted into audio file and is routed through the vst track.

I will explain freeze function some other day. Now if you ever  experience drop outs while working on a project don't panic.

Friday, February 9, 2007

Latest reasonable Computer Configuration for Audio recording

Yesterday I configured a Computer system for one of my friend. It was performing very well. The details are given below :
  • Motherboard - Intel 965WH
  • CPU - Intel Core 2Duo 6300 ( 1.86 Hz with 2 Mb cache)
  • RAM - DDR2 667 MHz 1 Gb
  • Hard Disk - Seagate SATA 250 Gb (8 Mb buffer)
  • DVD Writer - Liteon Alrite 20 x
  • Floppy - Sony
  • Keyboard & Mouse - Logitech Keyboard with optical Mouse
  • SMPS - Gold
  • Cabinet - iBall
  • Monitor - Samtron 740N 17" LCD Display
  • Sound Card - Edirol UA25 USB audio interface
DVD drive was bundled with Nero essentials 7.0 which has most writing features and the Edirol firewire audio interface had Cakewalk SONAR LE recording software bumdled. The motherboard has 6 SATA and one IDE port. Motherboard has 6 USB ports in the rear and two connectors for the front panel. There is one fireWire and one Ethernet LAN port also in the rear. I disabled the LAN port, Built in Audio interface and parallel port just to keep the system resources free. This motherboard has RAID and AHCI support for SATA apart from IDE mode. The system is performing well. You may also configure this system if you are looking for a reasonably priced pc for your audio recording setup.

Saturday, January 27, 2007

TIPS: Edit Tempo Track in Nuendo 3

Today, I am explaining how you can edit tempo in NUENDO 3 with ease.
  • First of all you should check that "Tempo" is highlighted in the Transport bar as shown below in Step 1. The Tempo initially is set to 120 BPM.
STEP:01

  • After that go to Project menu and select "Tempo Track" ( Ctrl + T ) to open the Tempo track window as shown below in Step 2.
STEP:02
  • Then in the Tempo Track window select the Draw tool as shown below in step 3.
STEP:03

  • You should not forget to select the Snap (otherwise you will be wasting time in placing the exact position of your tempo change) so that the Draw tool plots exactly on the bar and not here and there as shown below in step 4.

STEP:04


  • Now insert the tempo using the draw tool and set the required BPM. Here it is set to 140 as shown below in step 5.

STEP:05


  • If you cannot draw / plot at the correct value using mouse you need not worry, since you can always change the value by highlighting the plot and inputting the number in the box to rectify as shown below in step 6.

STEP:06


So now you see that it is very easy to insert tempo changes where ever required without much hassle.

Wednesday, January 17, 2007

Hardware Vs. Software Synth / Sampler

As we all know that for past so many years we have been using hardware synthesizers and Samplers in creating music. But now the time have changed, we all mostly opt for software synth / Samplers ( better know as VSTi, DXi, RTAS and REWIRE Modules etc. ).

  1. The advantage of a software plugin is that it can be upgraded or modified over the period of time to keep pace with the technology, whereas hardware synth / sampler gets out dated over time and there is no resale value also.
  2. If your system ( Computer ) is giving trouble or not working, you can install the plugin on a different system and keep working while your first system gets repaired; whereas if your hardware synth / Sampler is not working you become helpless and have to wait till you get it repaired ( its difficult to obtain specific parts also ).
  3. It is a difficult job to carry all your rigs ( Samplers, Synthesizer, sound modules, mixer & cables etc.) to studio or any other place and make all cable connections to start working on the project. Whereas you can carry all your plugins ( VSTi, Dxi, RTAS & Rewire Modules etc. ) within your laptop or computer itself.
  4. FREE Hardware synth / Samplers are not available, whereas you get many FREE Vsti and Dxi plugins for download. Hence your number of virtual instruments can increase without increasing your cost.
  5. Quality of your software synth / samplers depend on you audio interface, So you can always upgrade to a higher quality sound card for better results. Whereas Hardware quality is dependent on its native circuitry and components used which cannot be upgraded.
If you are planning to buy any sampler or module then think thrice about the soft synth before you invest into it. Keep pace with time. These days computer has become the backbone of music production.

Sunday, January 14, 2007

Windows Live Writer

Today I have downloaded Windows Live Writer. I think this will help to post my blogs faster.

It has lots of editing features - let me just try and see.

Sunday, January 7, 2007

TIPS: Calculate Delay time to synchronize with Beat

I know that most of the musicians and recordists are always confused about how to set delay time in Delay effects. It is very simple, but only if you remember the equation.

  • Delay time in ms (Milli-seconds) = 60000/BPM (Beat Per Minute)


The above equation gives you the timing for every beat (i.e. the delay repeats will be synchronized with your beats).


The same thing in a musicians term will be as under :


  • Delay time for crotchet in ms = 60000/BPM (Beat Per Minute)
  • Delay time for Quaver in ms = 60000/BPM/2 (Beat Per Minute)
  • Delay time for Semi-Quaver in ms = 60000/BPM/4 (Beat Per Minute)

Example :

Suppose your song tempo is 120 BPM, then the delay calculation is as follows:


  • Crotchet timing in ms (Milli-seconds) = 60000/120 (BPM) = 500 ms
  • Value for Quaver is = 500 ms / 2 = 250 ms
  • Value for Semi-Quaver is = 500 ms / 4 = 125 ms

For recordists who are not familiar with the musical terms:


  • Value of Crotchet is for synchronizing with 1 beat.
  • Value of Quaver is for synchronizing with 1/2 beat.
  • Value of Semi-Quaver is for synchronizing with 1/4rth beat.

Explanation :

BPM means beats per minute. So a tempo of 120 BPM means that the song is playing 120 beats per minute. Therefore 120 beats / 60 seconds = 2 beats per second. Since 1 second = 1000 Milli-seconds, hence if we divide 1 second (1000 Milli-seconds) by 2 Beats, we get 1/2 seconds ( 500 Milli-seconds) for every beat.

So, now no one should get confused while deciding the delay time in a delay plugin.

Monday, January 1, 2007

"Happy New Year"

Hi.

WISH YOU ALL A VERY VERY HAPPY AND PROSPEROUS
HAPPY NEW YEAR
" 2007 "


!! ENJOY !!

"me"

Popular Posts